We will now assume that you are all set to publish your pages online:
- You have a server online with an account, either an admin account or a normal user account
- Maybe you don’t have an account on an online server, but you have Linux and LAMP installed on your laptop so that you can develop locally and view your web site on localhost
- You can create an empty page locally and upload it with FileZilla or FireFTP to your Document Root
- You can connect to the server by SSH and create a file in your Document Root with the “touch” command or with nano
- You can then edit the new files remotely by using Komodo, as explained in the previous section: first create a server in Komodo preferences, then open a remote file on this server with: File –> Open –> Remote file
In the exercise at the end of the previous section we have seen that putting a page with some text online is really easy: type the text in the page, give the page file name an html extension (test.html for example), upload the page to your Document Root, this is all is needed to get the page published.
However, the formatting of our text in the page will be quite basic. If we do not use any HTML, all the text in the page will be rendered, in the browser, on the same line. Newlines are ignored or rendered as a space.
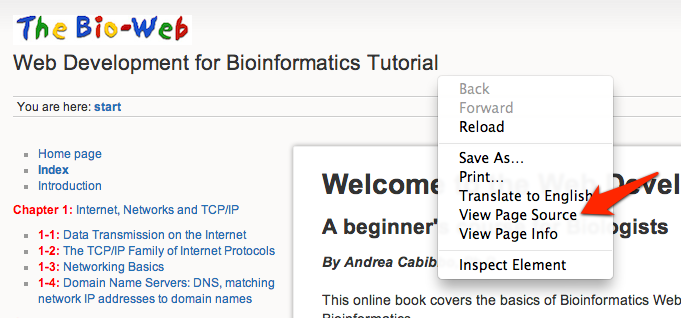
The text/content of an HTML page is called the “source code” of the page, or just the “source”. The source of any web page can be seen by right-clicking on the page in the browser so as to show the contextual menus and selecting the “View Page Source” option.

Let’s consider the following source code:
|
1 2 3 4 5 |
We are learning HTML and CSS so as to develop bioinformatics applications for the web |
If you copy and paste this text in a page with a .html extension and then view the page with your browser, you will see how newlines are ignored. Check it out. Here’s what you get:
We are learning HTML and CSS so as to develop bioinformatics applications for the web
So indeed we could publish pages like this, with text only. No formatting, no links, no images, no layout, no colors. Just static text, all on one line.
Although indeed at the end of the day raw content is king, as you can surely see this situation has some limits. In order to access all these formatting goodies, we really need to use some HTML.
For instance, concerning the example above, to introduce a line break. We could use a break tag <br>:
|
1 2 3 4 5 |
We are learning<br> HTML and CSS</br> so as to develop bioinformatics applications for the web |
Check out that the code above will correctly render the lines and line breaks.
Let’s quickly mention here that while many tags have to first opened and then closed, so as to delimit a part of page contents, other tags are “self standing” and do not delimit a part of the page contents but rather have a meaning by themselves. The break tag is an example of such a self standing tag. Another example is the img tag, used to insert images within a web page.
Examples of tags that should be opened and then closed are the the head, body and html tags that we will discuss right now in the next section. For these and many other tags, there will be an opening tag, some contents, and then a closing tag. The closing tag is the same as the opening tag except that it will have a forward slash right before the name of the tag:
|
1 2 3 4 5 |
<html>......</html> <head>......</head> <body>......</body> |
Page content portions delimited by an opening and a closing tag could be just some text, or parts of the page containing text and other tags. For example, while the html tags basically enclose all the HTML in the web page, so contents within will typically contain several other tags (including the head and body tags, by the way), a paragraph p tag may well, although not necessarily, just contain some text.
|
1 2 3 |
<p>Just some text</p> |
Confused? Hang tight and keep reading.
The minimal scaffold of an HTML5 web page
Before we get into the analysis of the most used HTML tags, we should start by saying that a correctly written “empty” HTML page is not really empty. It has some HTML code in it, that forms a light scaffold able to receive our content and all the information associated with this content, such as for instance and indication of which HTML language version we are using, the page title, the page Description, the CSS styles information and more.
Let’s see what a minimalistic HTML5 web page looks like. We will come back to HTML5 in more detail, for now let’s just say it is the more recent “brand” of HTML, the one we’ll use during this course.
All your web pages, either written manually or maybe outputted by a script, should respect this basic structure:
|
1 2 3 4 5 6 7 8 9 10 11 12 13 14 15 |
<!DOCTYPE html> <html lang="en"> <head> <meta charset="UTF-8"> <title>My Title</title> <meta name="description" contents="The description of the site here"> </head> <body> Hello World! </body> </html> |
Let’s have a look at these lines, one by one. It is essential that you get familiar with this basic structure as you will use it over and over, for each and every web page you will build in your life from now on (serious stuff, indeed).
Empty lines are simply ignored by the browser. However you can use them in your source code to make it more readable by humans (you for example).
The Doctype Line
This first line specifies that the document is an HTML document. It also specifies the HTML “brand” or version used in the document. The HTML5 DOCTYPE declaration is lightweight and easy to remember:
|
1 2 3 |
<!DOCTYPE html> |
as compared for example with the HTML4.01 DOCTYPE declaration:
|
1 2 3 4 |
<!DOCTYPE HTML PUBLIC "-//W3C//DTD HTML 4.01//EN" "http://www.w3.org/TR/html4/strict.dtd"> |
The html Line
The
|
1 2 3 |
<html> |
tag indicates that what follows is the actual HTML code of the page. See how this tag is closed at the end of the document:
|
1 2 3 |
</html> |
Optionally, the html tag can contain a “lang” attribute (more on attributes later on). Set it’s value (more on attributes values later on) to the actual language code that matches your contents.
|
1 2 3 |
<html lang="en"> |
in this last line:
“html” is the tag
“lang” is an attribute of the html tag
“en” is a value of the lang attribute of the html tag
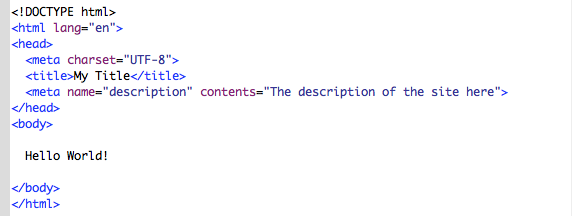
See in figure 3-4-2 how these different HTML elements are rendered in different colors when the code is viewed in a source code editor.
The Head Section
Then starts the Head section:
|
1 2 3 |
<head> |
After the Head section contents, the head tag is closed:
|
1 2 3 |
</head> |
The Head section can contain various information on the page, mostly invisible to the user (except the page Title, shown at the top of the browser window), such as Meta tags, CSS declaration and/or links to CSS style pages, Javascript code and/or links to javascipt code and more.
For now let’s have a look at the Title and Meta tags, we’ll be back to CSS and Javascript later in this chapter.
The Title Tag
The Title tag is used to set the page title. This is a very important piece of information as it tells search engines what your webpage is about. It is generally shown in the search engines results, linked to your web site URL.
|
1 2 3 |
<title>Your page title here</title> |
The title tag should be opened before the title text:
|
1 2 3 |
<title> |
and then closed:
|
1 2 3 |
</title> |
The Meta Tags
The Meta tag contains information about the page that is not displayed to visitors but rather used by the browsers and/or the search engines.
Meta tags are always located in the Head section.
A page can have several Meta tags
Your Head section will contain at least one Meta tag, for specifying the Charset (Characters Set) for the page, the kind of encoding for the characters in the page. We suggest you use the actual Unicode standard charset UTF-8.
|
1 2 3 |
<meta charset="UTF-8"> |
A description Meta tag, although optional, is also frequently included and provides a description of the web page contents. This description is sometimes displayed by search engines in the search results so it is worth including it for better search engines indexing of your web site.
Although it is not strictly required, we have included a description line in our minimal page above.
The Body Section
After the Head tag is closed, the Body tag is opened:
|
1 2 3 |
<body> |
The Body section contains the actual content of your web page which is seen by the page visitors. For now we just have the usual Hello World greeting.
The Body tag is closed at the end of the page, right before the closure of the Html tag:
|
1 2 3 4 |
</body> </html> |
Syntax Highlighting in Code Editors
It is worth noting how the code for our minimal page is shown in Komodo Edit

See how:
- The Tags are in light blue
- The Attributes are in purple
- The Values are in dark blue
- Normal text is in black
This makes HTML code very easy to read and manage in a specialized source code editor with respect to a generic text editor.
If you didn’t already, write down your minimal HTML page and upload it to your server. Play with the Title and Break tags. Edit, save, reload and check, start to get familiar with the web development cycle.
Cellbiol.com online web editor
You can also use our online web editor to practice with HTML, CSS and javascript code editing without having to edit or upload documents anywhere.
To use the editor, just insert your HTML code in the first (upper left) pane, CSS declarations, if any, in the second (upper right) pane, javascript, if any, in the third pane, and see the rendering results in the last (lower right) pane.
Web editor credits: Bhaskar Tiwari, https://github.com/bhskt/simpleWebEditor. Thank you Bhaskar for this handy resource! You can easily install this web editor on your own server, it is just a single .html page!
Now that we have the basic structure of an HTML page, we can start to learn about Text Markup with HTML.
Chapter Sections
[pagelist include=”135″]
[siblings]